
Configuring YouTube: Your First Step with WebinarJam

![]()
Click the button to the right to print this chapter.
Congratulations! Welcome to WebinarJam!
If you have not previously seen the Jamming with Friends Introduction, we’ve recently made some updates. It now appears in Chapters for your convenience.
You can print any chapter by pressing the Print button in the upper right corner of the page.
We understand that a first glance of Jamming with Friends may have you thinking, “Wow… That’s a lot!”
Fear not! This step only needs to be done once. It is required by YouTube and enables your attendees to see your JamSession live and replay webinars. Think of it as the veggies you must finish so you can enjoy dessert!
Once this is complete, we’ll work on setting up your first webinar!
This Chapter is broken down into sections as listed below:
- What is Embedding?
- Changing Your YouTube Features
- Connect Adsense
- Configure Monetization
- Confirming Embed is On
What is Embedding?
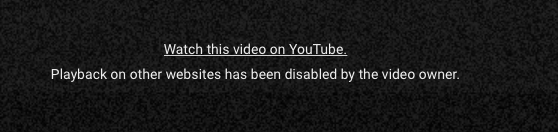
“Embedding” means allowing your video to work and be visible within the WebinarJam interface. If it is not turned ON, your attendees are going to see a black screen with snow and the message: “Watch this video on YouTube. Playback on other websites has been disabled by the video owner.”
Let’s avoid that, yes?
Changing Your YouTube Features
Step One is to enable YouTube features.
YouTube requires that you have Monetization enabled and AdSense linked to your account to be able to embed live streams
To do so, you need to log into the YouTube account that you use for WebinarJam.
Then visit http://www.youtube.com/features and Enable Monetization, Live Streaming, and Embed Videos. All three of these must be Enabled. You may need to accept some terms and change some settings. Once they are enabled, they will have a green line underneath.
See the red arrows in the image below. 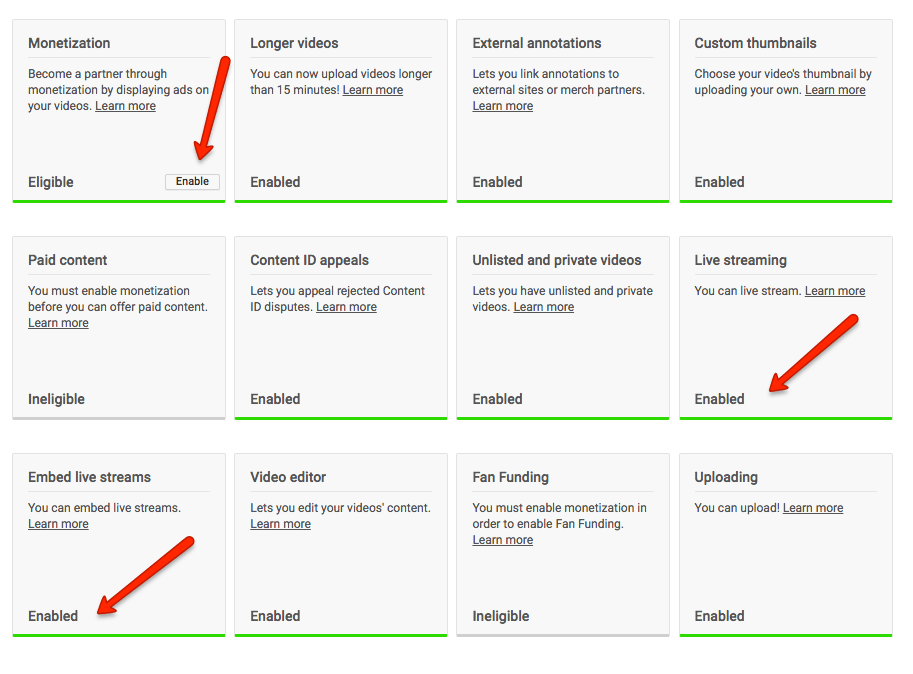
Connect Adsense
You may not be able to “Embed Live Streams” until you have Adsense. Click on the “active AdSense account” link under Paid Content and you’ll see that you can either connect an existing AdSense account or apply for a new one.
Follow the Adsense system instructions and it will guide you through the process. You can also read Google’s information on Adsense.
We recommend using your YouTube channel for your website when creating your Adsense.
WARNING: After you’ve applied for an AdSense account, you’ll get a response that accounts are under review and will take up to a week for approval. However, Google Help informed us that “applications for AdSense from YouTube are usually reviewed within 48 hours”.
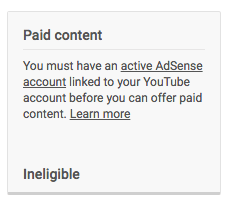
If your account says “Paid Content” is “ineligible” as in the photo on the below, it’s because your YouTube account has less than 1,000 subscribers.
The great news is this isn’t necessary! (Read YouTube’s eligibility criteria)
NOTE: If you already have Adsense you will want to follow the instructions under the drop down “If you already have an approved Adsense” here. Next Level Tricks has a step by step article on multiple YouTube channels with one Adsense.
Configure Monetization
Visit https://www.youtube.com/advanced_settings and click the checkbox shown below to allow advertisements to be displayed with your videos.

Confirming Embed is On
This step confirms your settings allow your videos to be embedded. If you see “This stream is offline” then your account has live streaming! YAY!!!
Now, while you are already on this link, it is the time to change the default settings for promotions and privacy. This helps reduce the stress and worry of forgetting to change the settings during the webinar. This way, your YouTube Subscribers will not see your test webinars or watch webinars outside of the WebinarJam experience.
First, go to YouTube.com/live_dashboard
- Confirm you are on Live Streaming/Stream Now (Marked #1 Below)
- Scroll down (Marked #2 Below)
- OPTIONAL: Change the Privacy setting to “Unlisted” from the dropdown. (Marked #3 Below)
- Click “Advanced Settings” (Marked #4 Below)

Every Live Stream you do will be Unlisted. However, you can go into your Live Streaming Dashboard to change it as necessary.
- Be sure you are on “Advanced Settings” (Marked #1 Below)
- OPTIONAL: Uncheck both boxes under “Promotions” (Marked #2 Below)
- Confirm that Embedding is checked (marked #3 Below)
Read Troubleshooting Embed Settings if your Embedding is not allowed.

Part 1 of Jamming With Friends: Webinar Setup
Next Chapter Configuration of Your New Webinar