Perhaps you want to customize your registration page more than our program allows. Sometimes you want the page on your site. This will help you do both.

Download the full PDF document: How to Create a Custom Registration Page in WJ
Create a Custom Registration Page
On your registration page you will want to select the last option for choosing a design for your webinar registration page which is “Your Own Custom Design” Go ahead and Click Load Template.
On the “Your website url” line you need to enter the URL for the page you are going to use for Webinar Registrations.
Save the Module
You can preview at this point, but it will not have the registration button yet.
You need to publish your webinar.
Get Your Custom Embed Registration Button

Go to your Dashboard and select Get Links.
On the page you want “Embed registration button in your own site” however the instructions assume you only want the link on one place on your page.
You will need to copy all the code in this box.
Go to the registration page on your site. If you are using WordPress you will want to select Text so you can insert it as HTML code. No matter what program you use for your website you need to be able to insert this code as HTML.

Insert a 2nd Button
So for the rest of the places you’d like for a button to appear, you can insert this part of the code (specific to your webinar)
If you’d like the button to appear more than once on your page, then all you want is the first part of your code:
To Insert a second button you need just the first lines of code <div class= ….. to </div>

Testing Your Page
Go back to WebinarJam and get your registration link. That should take you to the URL where you inserted your button.
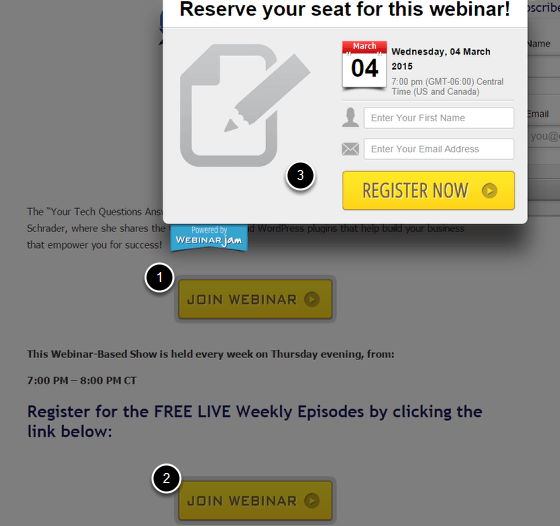
- This button when clicked will pop open the registration form
- This second button will send your registrants back up to the top button where they can register
- Go ahead and register to confirm the process works.


